How to protect containers from Living Off the Land (LOTL) attacks: A step-by-step guide
As organizations continue to adopt containerized environments, it’s critical that security teams understand potential risks, are aware of emerging threats, and have processes in place to manage them. CISA and global partners recently issued guidance about nation-state cyber threats involving Living Off the Land (LOTL) techniques. LOTL attacks exploit legitimate system tools to carry out malicious activities and can be difficult to detect. Building on our exploration of the various LOTL techniques, this post will break down LOTL threats in container environments, how attackers can abuse sudo and SUID permissions to gain elevated access, and actionable steps to secure your infrastructure.
Understanding sudo and SUID permissions
GTFOBins refers to a list of common UNIX binaries that can be exploited by attackers to bypass security controls.
While there are many categories in the GTFOBins catalog, this article will focus on sudo and SUID. This is because when we talk about LOTL, an attacker likely already has access to the system, and they are probably trying to elevate their privilege or set up persistence within a system. sudo and SUID permissions are particularly useful for achieving privileged access or persistence.
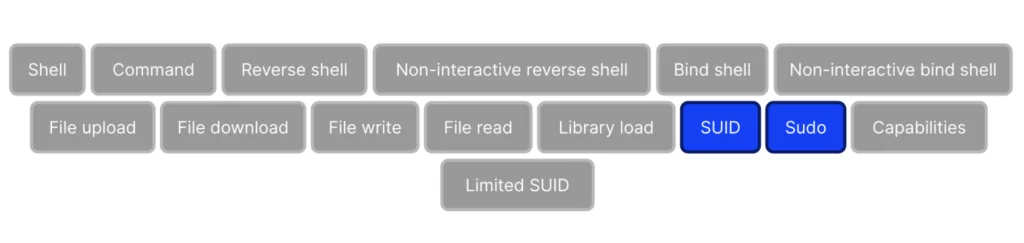
Figure 1: Sudo and SUID permissions are useful for achieving privileged access or persistence
SUID — or Set Owner User ID — is a permission flag (or bit flag). When set on a binary, it allows users to execute the binary with the privileges of its owner. This means the user is impersonating the owner of the binary as opposed to the user executing said binary on their own.
Why would we need this? There are instances where certain applications and operations require higher permissions than a regular user possesses.
One example of this is the process used to update a user’s password. A user’s password, or hash, is stored in /etc/shadow and the passwd command is used to update this file with the user’s new password hash.
When an unprivileged user tries to access the /etc/shadow file, they will get a permission denied message (Figure 2). Only root can read and write to the /etc/shadow file.
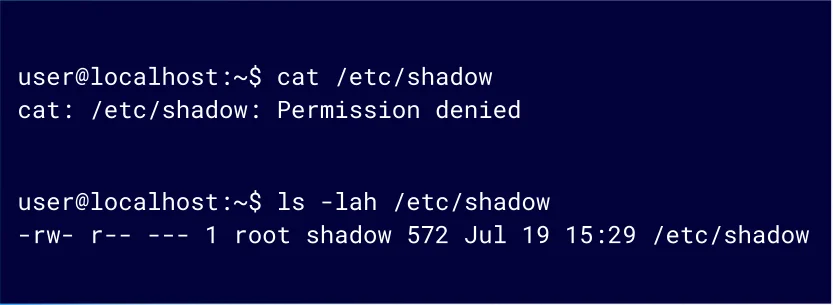
Figure 2: Trying to access /etc/shadow
So how is it possible to update that file without having access to it?
This is where the SUID bit flag comes into play. If the SUID flag is set, the command will be executed as the owner.
Figure 3 shows that the SUID bit is set for the owner (root) for the passwd utility. This allows users to update their passwords in /etc/shadow by using the passwd utility rather than doing so directly.
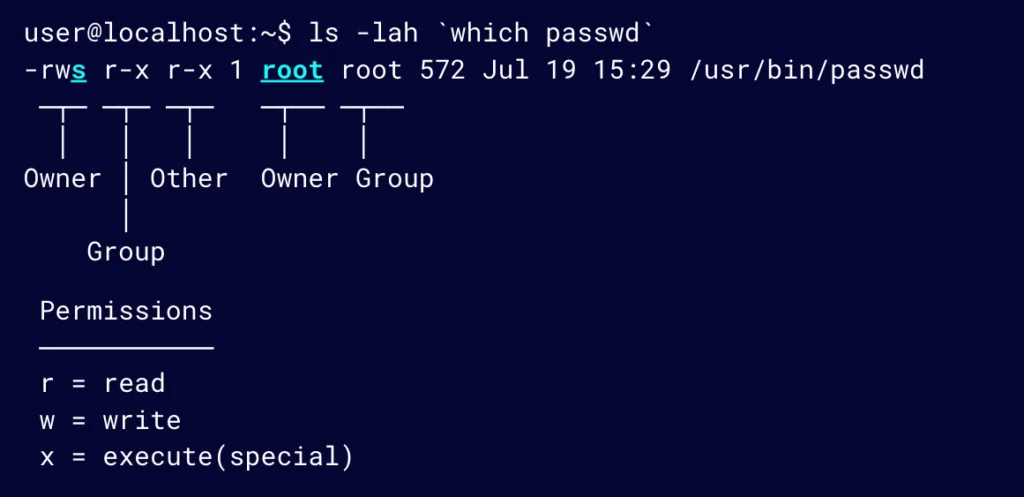
Figure 3: The SUID bit is set for the owner (root) for the passwd utility
Users can essentially change the /etc/shadow file using passwd; however, because it runs in the context of root, it doesn’t mean that it can be abused (e.g., to change the password of another user).
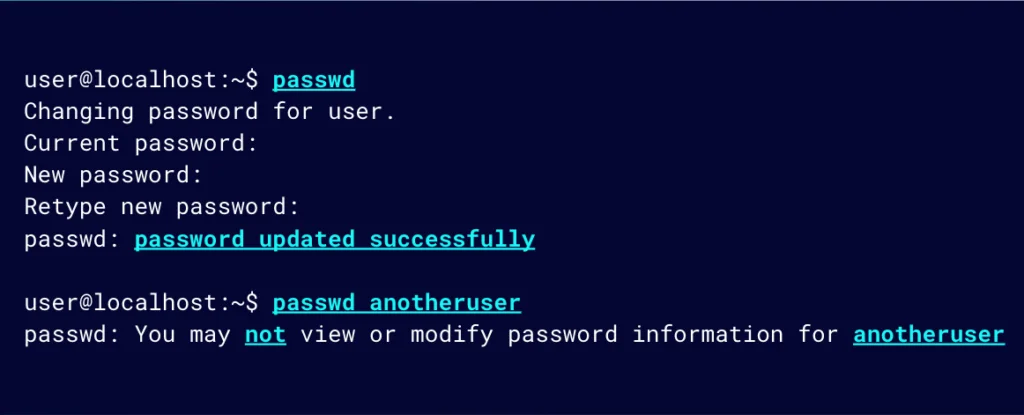
Figure 4: Users can change the /etc/shadow file using passwd, but they cannot use it to change the password of another user
This is because as the binary goes through its execution flow, certain checks will still be performed. For example, checks are performed to validate the current password before updating it to a new password, or to confirm that the user has the permission to change another user’s password.
As shown previously (Figure 2), we are unable to access or read /etc/shadow using `cat`.
But, what if we use the chmod command to set the cat binary with the SUID bit, similar to that of the passwd utility we just looked at?
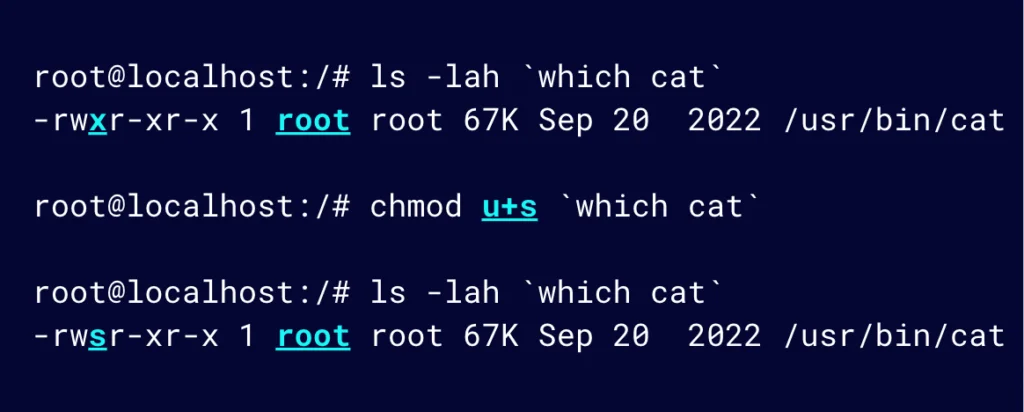
Figure 5: Use the chmod command to set the cat binary with the SUID bit
NOTE: Setting the SUID bit requires elevated privileges, so we will do this as the root user.
This means that cat will be executed with the effective permission of root, allowing us to read the contents of /etc/shadow, which our permissions would not typically allow us to do.
As mentioned before, the passwd utility has some checks that run during execution. For example, it’s designed to check that the user is trying to update their own password rather than another user’s.
In contrast, cat does not have that validation when executing. It is not designed with that in mind. It really only cares whether you have permissions to the file you are trying to cat. If you do, it will do so for you.
We can see that effect in this example (Figure 6). cat will read the /etc/shadow file now that we are effectively executing it as root.
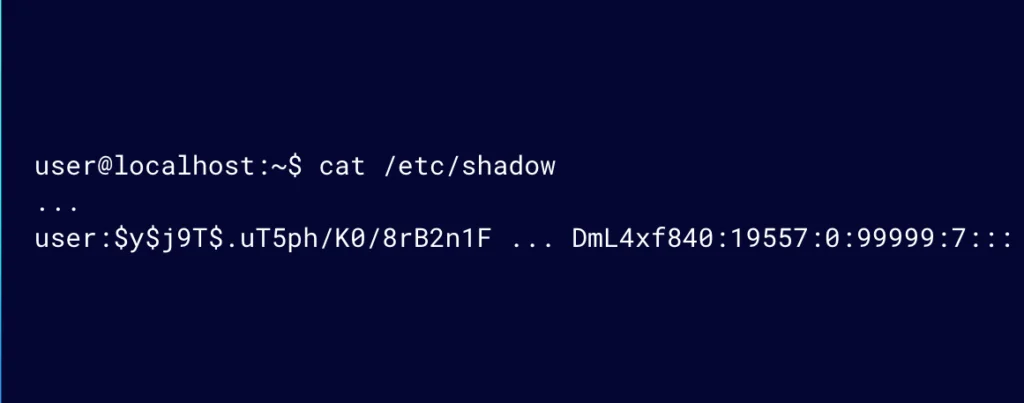
Figure 6: cat will read the /etc/shadow file now that we are effectively executing it as root.
It’s a strange concept, but it is a fairly logical and ingenious way of solving the limitation of writing to a sensitive file like /etc/shadow without having access to the file as a normal user.
Understanding the SUID flag will also help to understand sudo. Let’s look at the permissions of sudo:
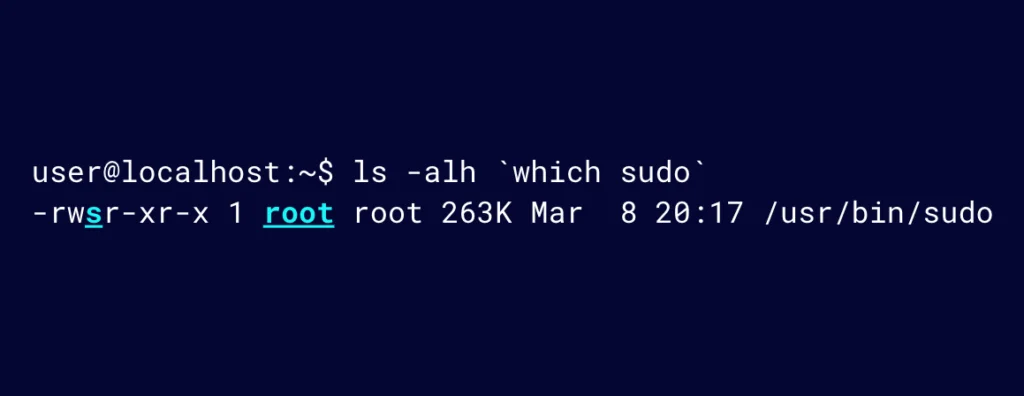
Figure 7: Sudo permissions
sudo works in the same way as passwd does, where it is effectively executed as root.
Whatever we are trying to do with sudo likely requires elevated permissions. But before sudo executes what was requested to be run with elevated privileges, it will first validate that the requesting user is allowed to perform the desired action. sudo does that by looking at the permission, or configurations, for the user; for example, asking for their password if it is configured in that way.
We previously set cat with the SUID bit, but let’s look at the same outcome using sudo.
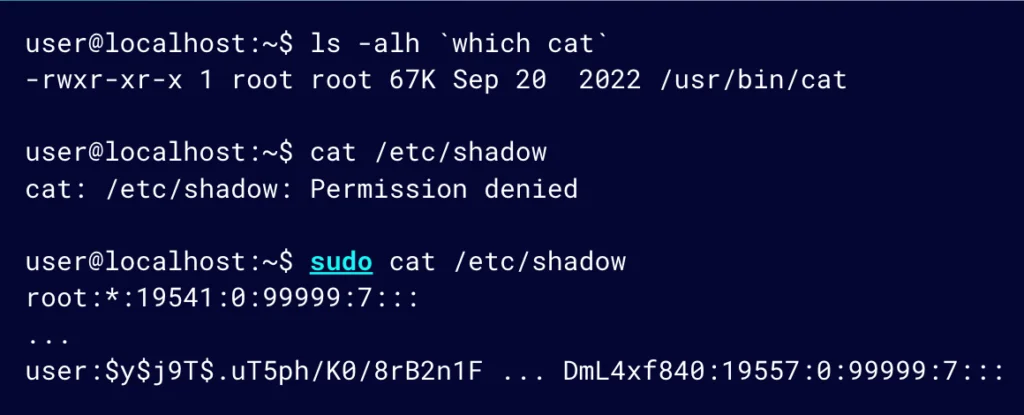
Figure 8: Running cat with sudo makes it possible to see the content of /etc/shadow
Looking at the permissions for cat, they are set as they should be. Trying to access /etc/shadow will result in a permissions denied error. However, running it with sudo, it is possible to see the content of /etc/shadow.
How is that possible?
sudo will do some validation or check whether the requested action is permitted to occur.
One way for this to be configured is in a user’s sudo config file, which may look something like this:
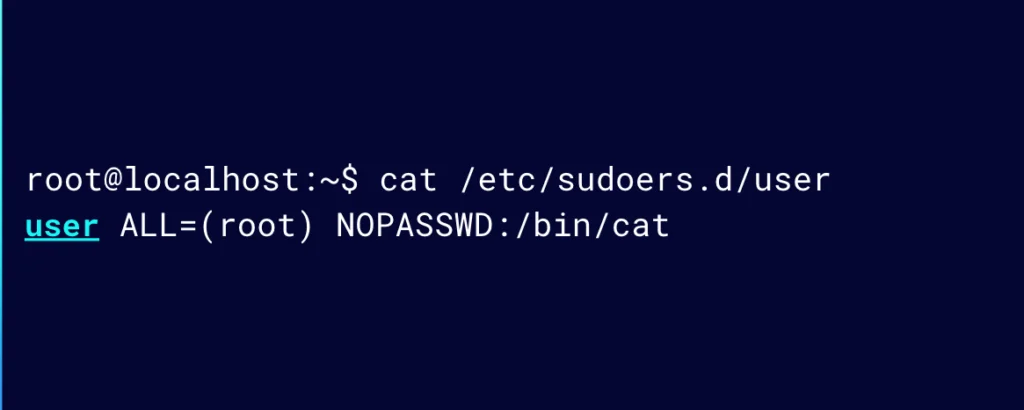
Figure 9: A user’s sudoers config file
This essentially means that the user can run /bin/cat as root without needing to confirm their password.
Grasping the “under the hood” operation of sudo is fairly easy when the SUID bit concept is understood.
Vulnerable scenarios involving sudo and SUID
Now that we know how sudo and SUID work and how it can be used and configured, we’ll explore a possible vulnerable scenario.
Let’s say that we have a web application and the web server user, www-data, needs to copy some files to a restricted area, maybe as part of a backup job.
In this scenario, a sysadmin set the SUID permission on the cp, or copy, utility instead of setting the correct permissions on the destination directory for the user.
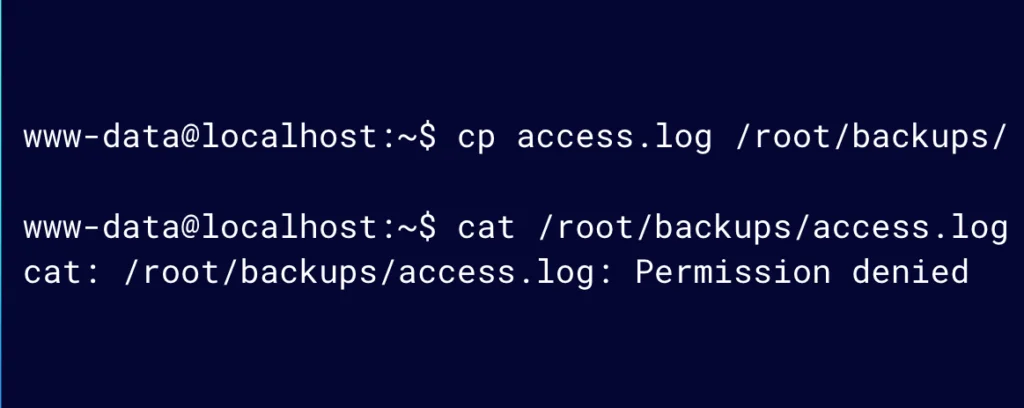
Figure 10: A sysadmin set the SUID permission on the cp, or copy, utility
Because the user only needs to write to a backup directory and do not need to read the backed up files after copying, our sysadmin might have assumed that setting the SUID permission on the cp command would not present any danger.
Let’s live off the land and read this file by abusing the SUID bit set on the cp utility as seen on GTFOBins.
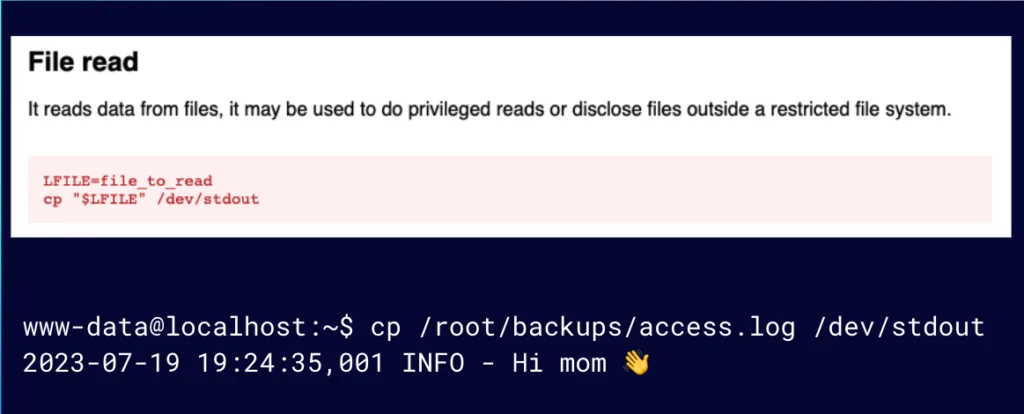
Figure 11: If we have cp with the SUID bit set, we can easily read a file
We see that if we have cp with the SUID bit set, we can very easily read a file by copying a file to standard out (stdout), even though www-data does not have access to read from the backup directory. This is an unintended consequence the sysadmin did not consider.
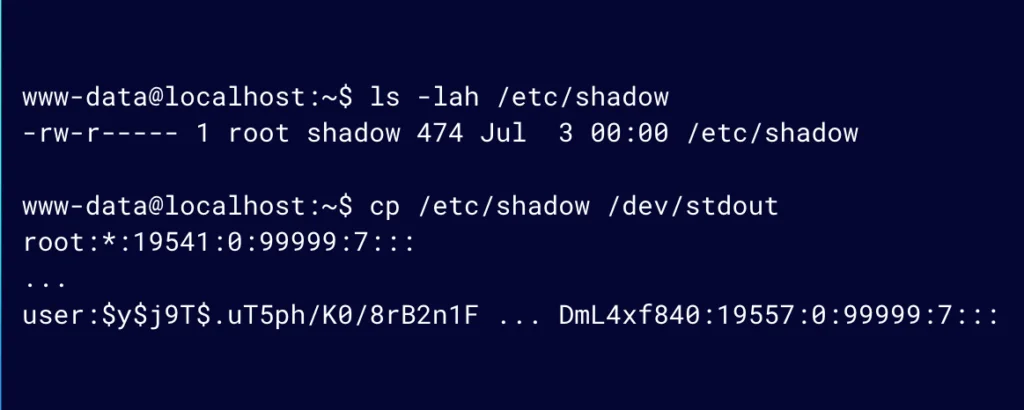
Figure 12: Now we can read other sensitive files like /etc/shadow
As you can imagine, this also means that we can read any other sensitive file such as /etc/shadow.
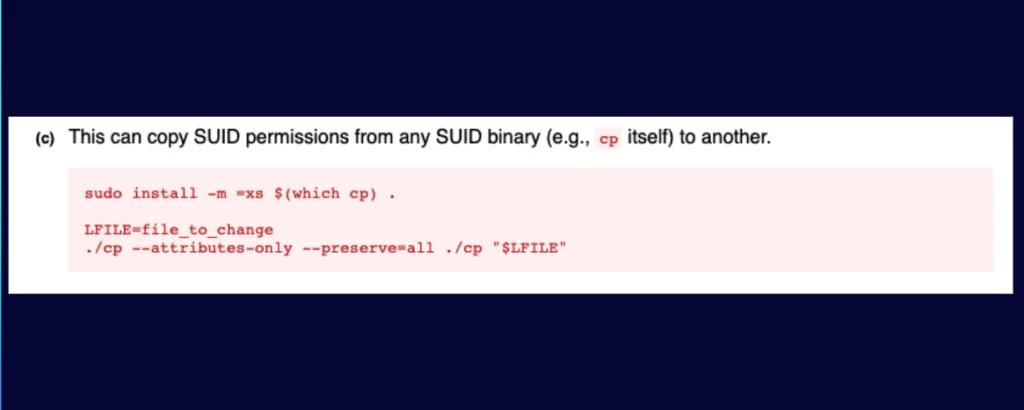
Figure 13: cp has an ability to get a privileged shell
Can we take this further? Again looking at GTFOBins for inspiration, cp has the ability to get a privileged shell. And it is going to be easier than you thought.
The cp command has two interesting flags (Figure 14). Attributes-only does not copy the data, only the attributes. Preserve is used to specify which attributes to preserve, and we’ll want “all”.
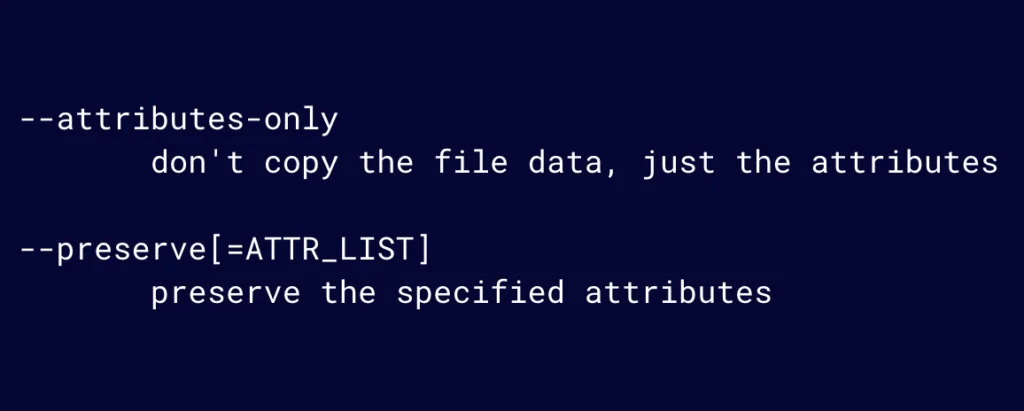
Figure 14: Attributes-only does not copy the data. Preserve is used to specify which attributes to preserve.
With these, it is possible to copy and preserve all the attributes, without the actual data of what is being copied. We know that passwd has the SUID set, so let’s copy its attributes over to sh. We can do this because our SUID bit on cp allows us to effectively perform this action as root.
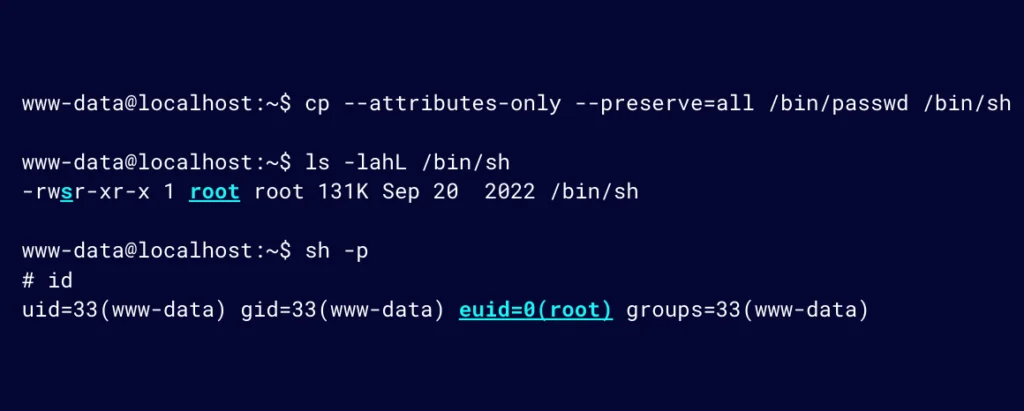
Figure 15: With these, it’s possible to copy and preserve all the attributes, without the actual data
Now when we execute sh with the SUID bit also being set, a new shell will be presented, as can be seen in Figure 15.
Notice that the UID is still that of www-data; however, the EUID is that of root. Going back to the passwd utility, this is why it is able to write to /etc/shadow (with EUID) but still has the context of the user (with UID) during execution.
Effective-UID is what determines which permissions the program has when executed. While this is not a full root shell, it’s easy to get that from here in most situations.
How to manage container vulnerabilities
Now that we understand LOTL, let’s explore how this relates to vulnerability management.
Typically, vulnerability management within the context of containers refers to the process of trying to identify which packages are present in a container and what their respective versions are. From there, you’ll determine if the version is vulnerable through mapping CVEs to the identified version of the package.
Although vulnerable LOTL binaries will rarely have CVEs associated with them, you could argue that it is a weakness that could be exploited. This makes it a vulnerability, which is something that we can and should manage within our organizations, et voilà! Vulnerability management.
But how might we go about this?
If we can see how a container image was built, we can try to detect when LOTL vulnerabilities are introduced into our container images. One approach, using Docker, is to use the docker history command to see all the RUN commands that were included or executed during an image build (Figure 16). Using the docker history command is useful for those who don’t have access to the Dockerfile.
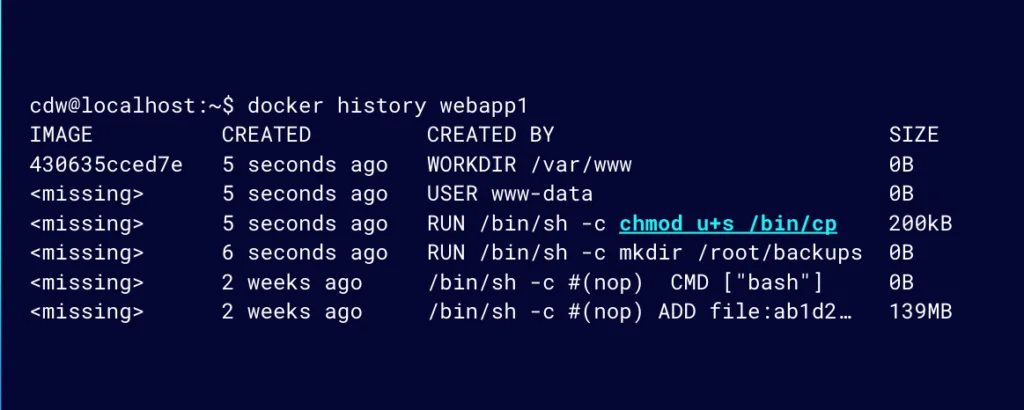
Figure 16: Use the docker history command to see all the RUN commands that were included or executed during an image build
This can help us detect or identify where a binary has been misconfigured, which could introduce LOTL vulnerabilities.
A basic approach might involve using grep to identify potential LOLBins vulnerabilities, as demonstrated below.
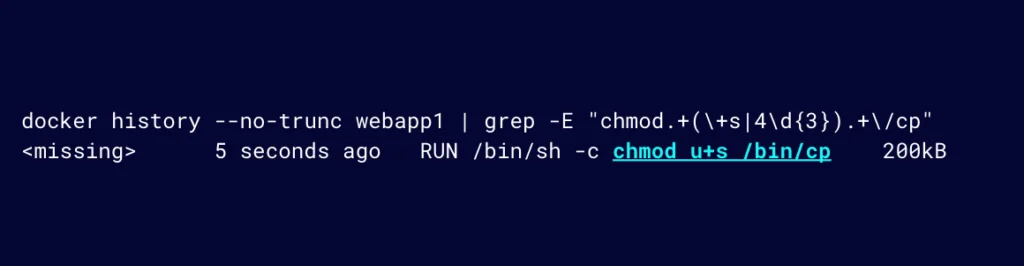
Figure 17: A basic approach might involve using grep to identify potential LOLBin vulnerabilities
While this is great; we now rely on having Docker installed to access the docker history command to inspect an image.
Security engineers within organizations usually have access to more than only the image, for example Dockerfile; if so, we can grep the Dockerfile.
Developers or DevOps engineers would likely want their containers built and pushed to some container registry for deployment. They are likely versioning their Dockerfile in a repository and relying on some automation there.
For that reason, let’s use GitHub, a well-known approach for version control and GitHub Actions to build and publish a container image to a container registry like DockerHub.
Security engineers can proactively help DevOps engineers by attempting to detect these LOTL vulnerabilities during the image build process using something like Github Actions. Let’s say this is our Dockerfile (Figure 18). We can see that we have a potential LOTL vulnerability here in one of the RUN commands.
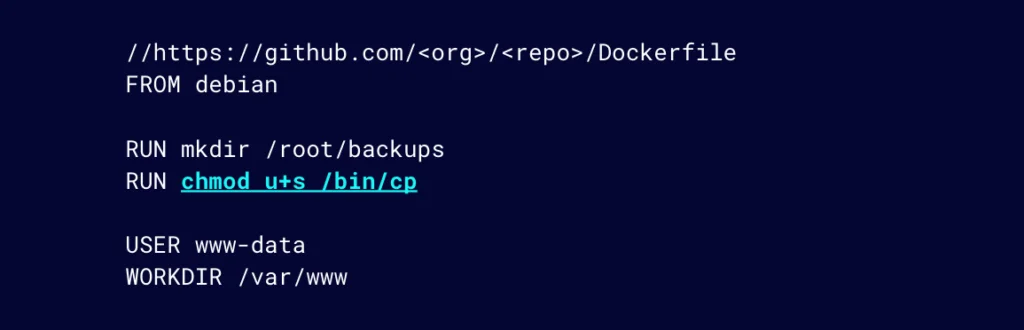
Figure 18: DevOps teams are likely versioning their Dockerfile in a repository like GitHub
By extending our previous basic grep approach through adding automation; let’s include the following script to the repository where this Dockerfile lives. The script makes use of the simple regex that detects our misconfigured cp command. If found in the Dockerfile, it will exit with exit code 1.
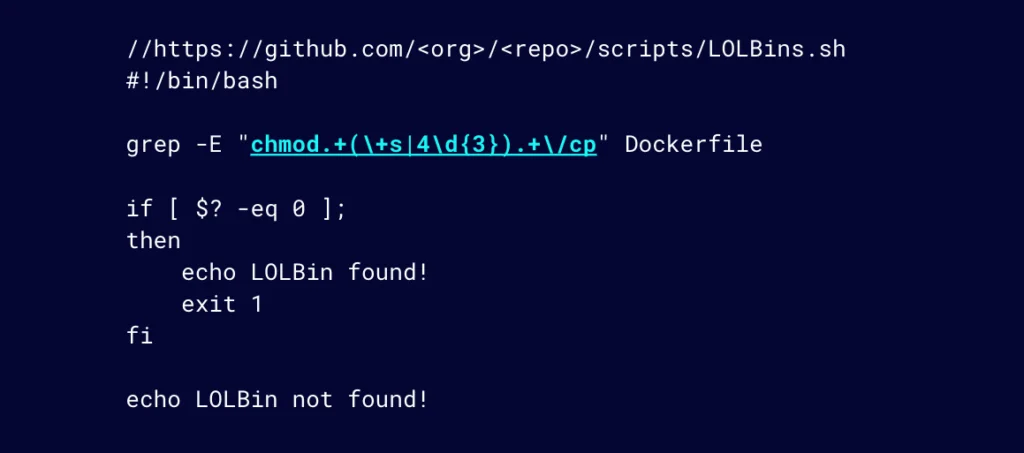
Figure 19: Simple automation script using regex to detect LOTL vulnerability
As part of the GitHub Action, we add a job to execute the script whenever a push is made to the main branch.
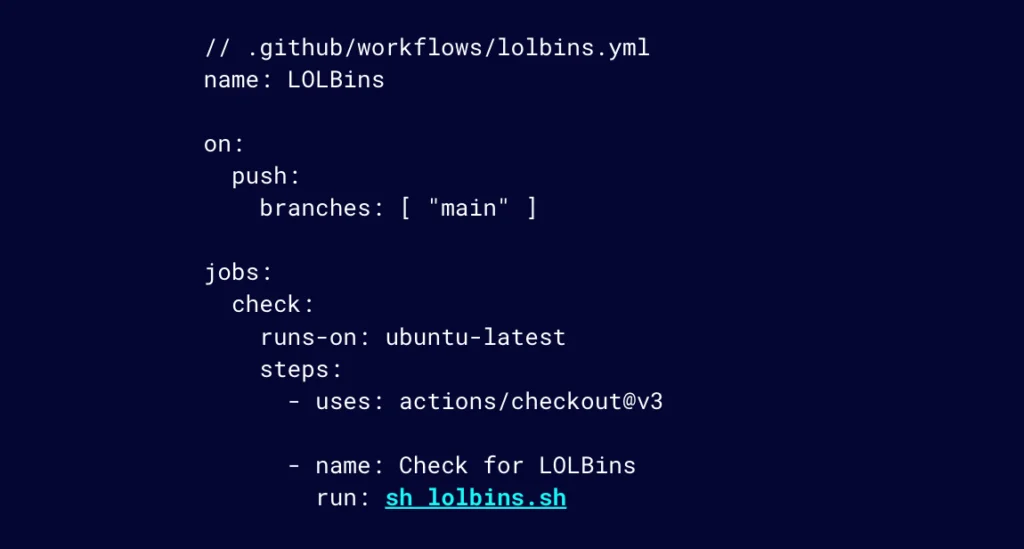
Figure 20: Add a job to execute the script whenever a push is made to the main branch
With this, our sysadmin will no longer be a victim of this LOTL vulnerability because the build will fail and the push to a container registry will be prevented from reaching a production build or environment.
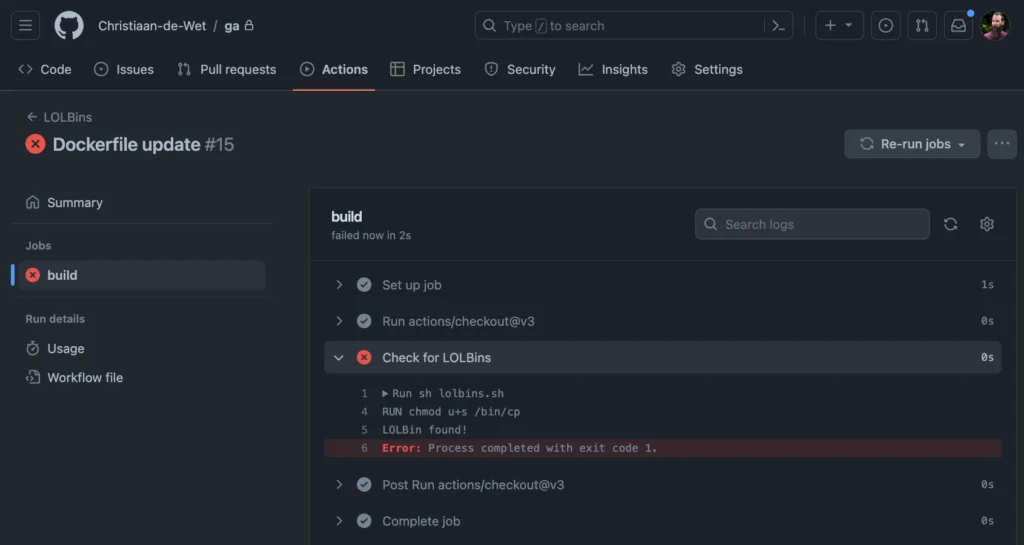
Figure 21: This LOTL vulnerability was prevented from reaching production
Stay up to date with the latest threats
LOTL attacks present serious risks as increasingly more organizations adopt container technology. By grasping vulnerabilities related to misconfigured binaries with elevated privileges, security teams can implement controls to identify these weaknesses early in the development process. We hope these insights provide a useful starting point for hardening your infrastructure against stealthy LOTL threats.
For more insights on the latest threats, follow Lacework Labs on LinkedIn.
If you are interested in learning how Lacework can help detect LOTL vulnerabilities during your build process, please reach out.
Suggested for you