Developing and testing cloud-based detections using Atomic Red Team on Lacework
In the ever-evolving world of cybersecurity, it’s crucial to stay ahead of the curve. One way to achieve this is by leveraging Atomic Red Team, an open-source project that helps you test your detection capabilities against known simulated adversarial techniques. With thousands of attack scenarios, over 7,000 GitHub stars, 46,379 weekly views, and around 10 new attacks added weekly, the Atomic Red Team library of scripted cyber attacks has become the industry standard for detection validation and attack simulation. It’s even embedded in many Breach and Attack Simulation (BAS) tools on the market today.
Atomic Red Team is a library, and it cannot execute the attacks on its own, which means it needs an execution engine to function. In this blog, we’ll use the most popular execution engine, Invoke-AtomicRedTeam, led by Carrie Roberts (@OrOneEqualsOne) and maintained by the Atomic Red Team maintainers. Lacework is a proud partner of Red Canary, the company that sponsors and hosts the Atomic Red Team project.
Lacework is a powerful cloud security platform that helps modern enterprises stay secure and compliant. The Lacework Query Language (LQL) is the versatile tool you’ll use to create custom detections within the platform. LQL is generally split into three sections: data source, filter logic, and data to return.
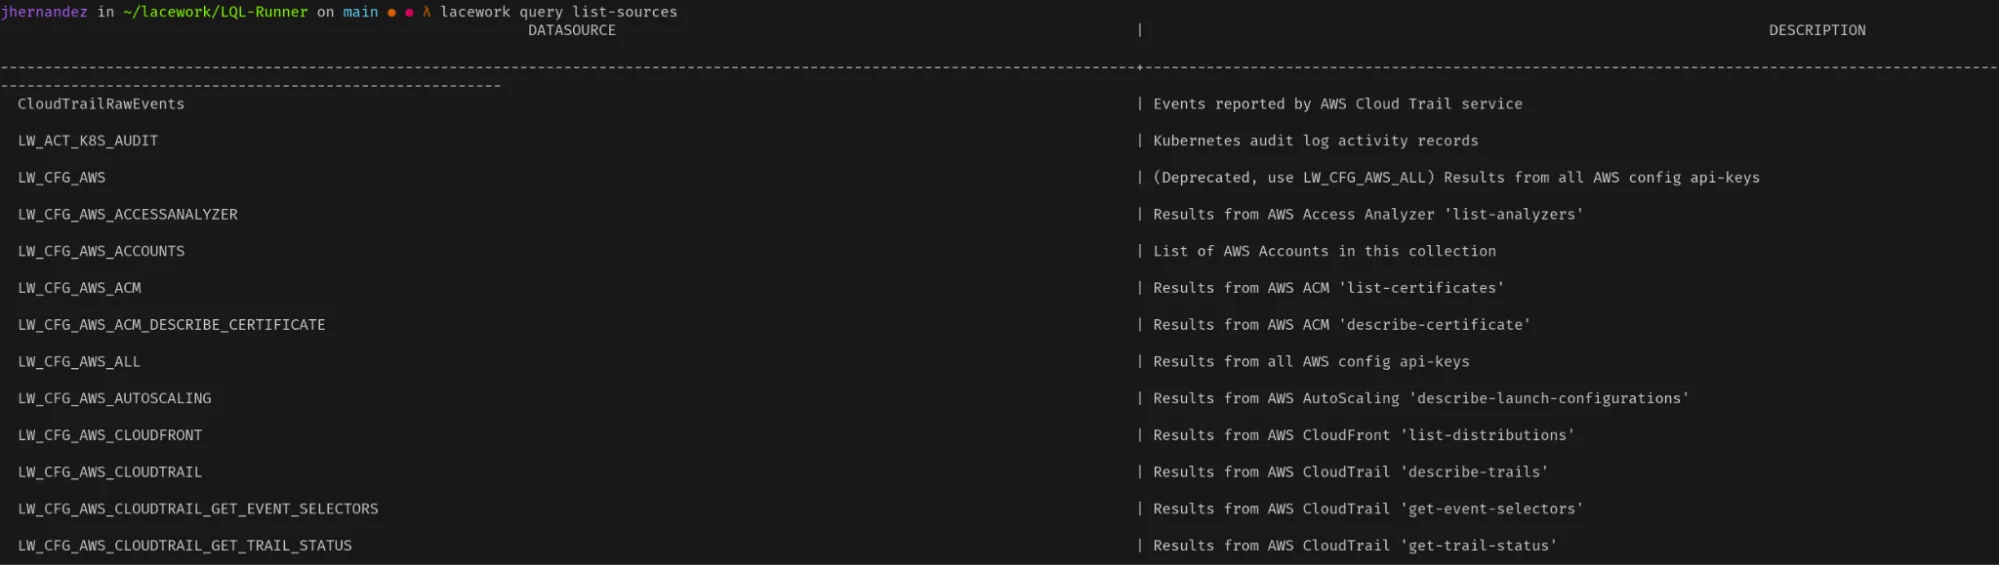
To start, let’s see which data sources are available for developing detections. Use the Lacework CLI and enter the following:
1
lacework query list-sourcesThe screenshot below shows what this looks like:
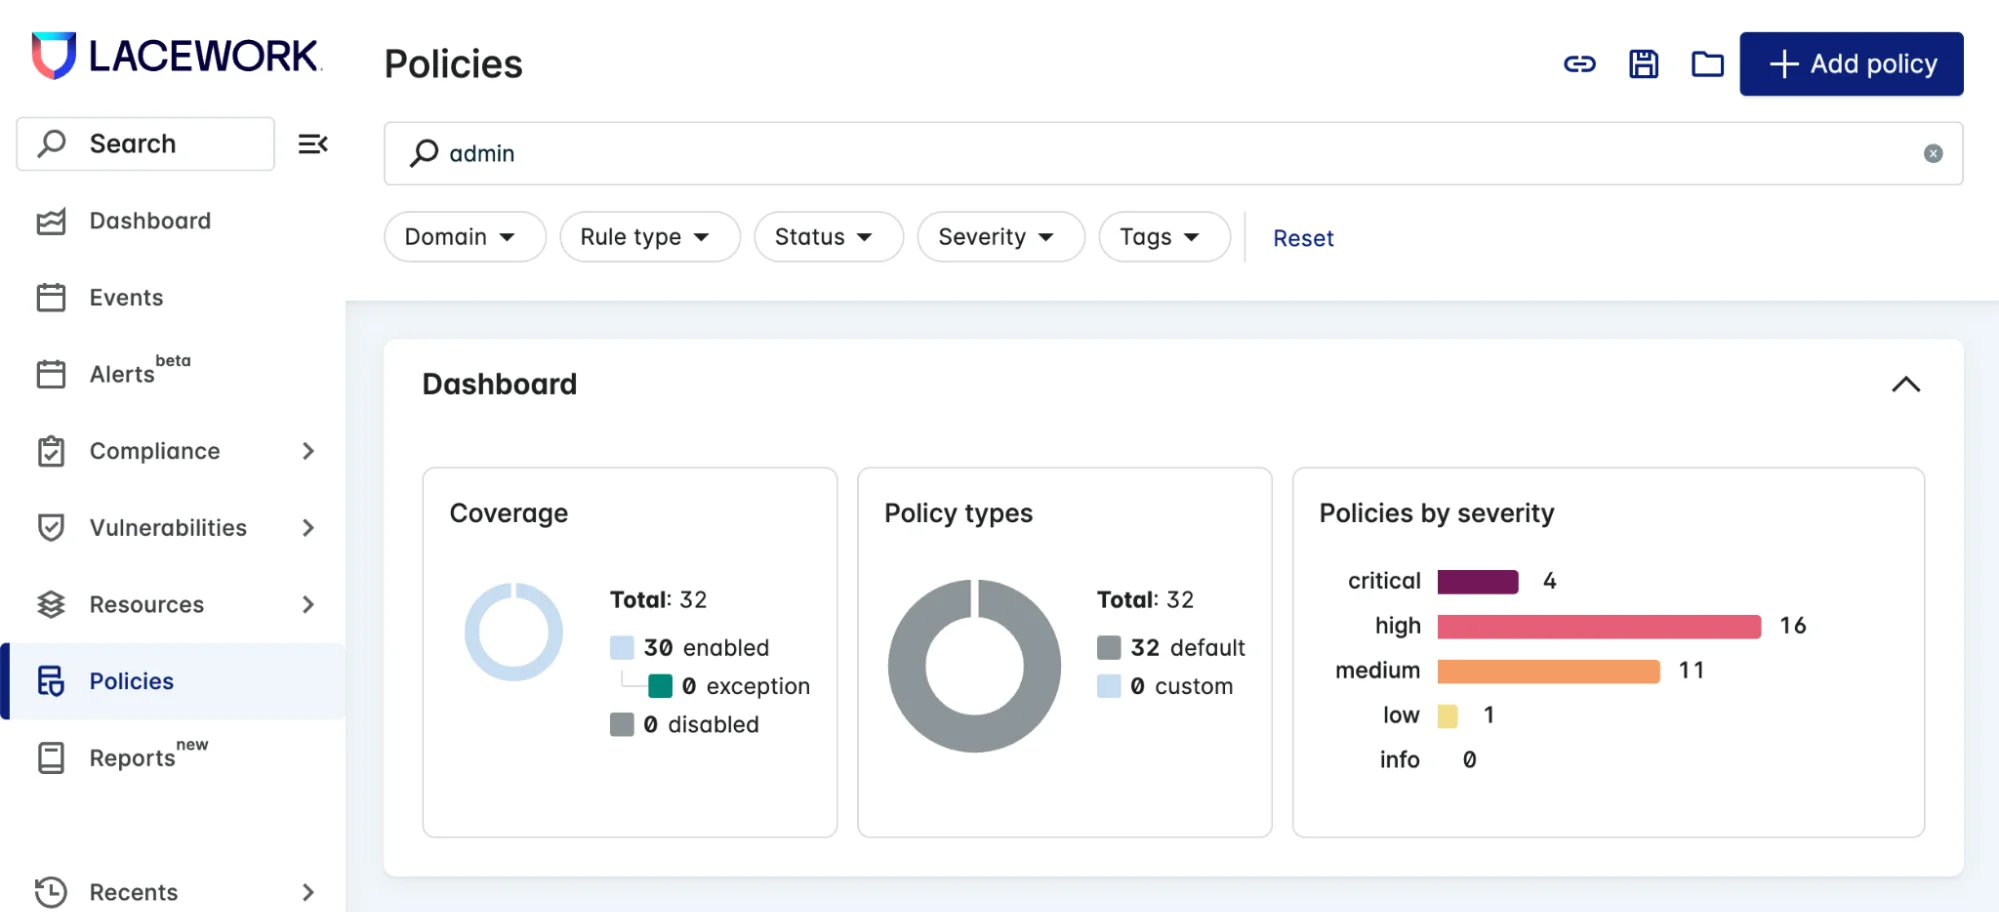
Keep in mind that Lacework already has numerous out-of-the-box detections for known and unknown attacks. You can find them on the Policy documentation page:
Now, we’re going to walk you through three scenarios of developing and testing cloud-based detections using the MITRE ATT&CK Framework. We’ll focus on these techniques:
- T1053.003: Replace crontab with reference file – Cron – Replace crontab with referenced file
- T1609: Exec into a container – ExecIntoContainer
- T1136.003: Create new IAM user – AWS – Create a new IAM user
T1053.003: Replace crontab with reference file
This tactic, technique, and procedure (TTP) replaces the existing crontab with a reference file for privilege escalation.
Prerequisites
Before you can run the tests, you need the following:
- A Lacework Linux agent reporting to a tenant and configured to collect syscalls
- The Atomic Red Team repository cloned on the machine with the agent
- PowerShell for Linux installed
Steps
1. Clone the Atomic Red Team repository: git clone https://github.com/redcanaryco/atomic-red-team.git
2. Install PowerShell for Linux. Depending on your Linux distribution, you can follow the instructions here.
3. Open PowerShell and install Invoke-AtomicRedTeam.
1
2
3
4
5
pwsh
IEX (IWR 'https://raw.githubusercontent.com/redcanaryco/invoke-atomicredteam/master/install-atomicredteam.ps1' -UseBasicParsing)
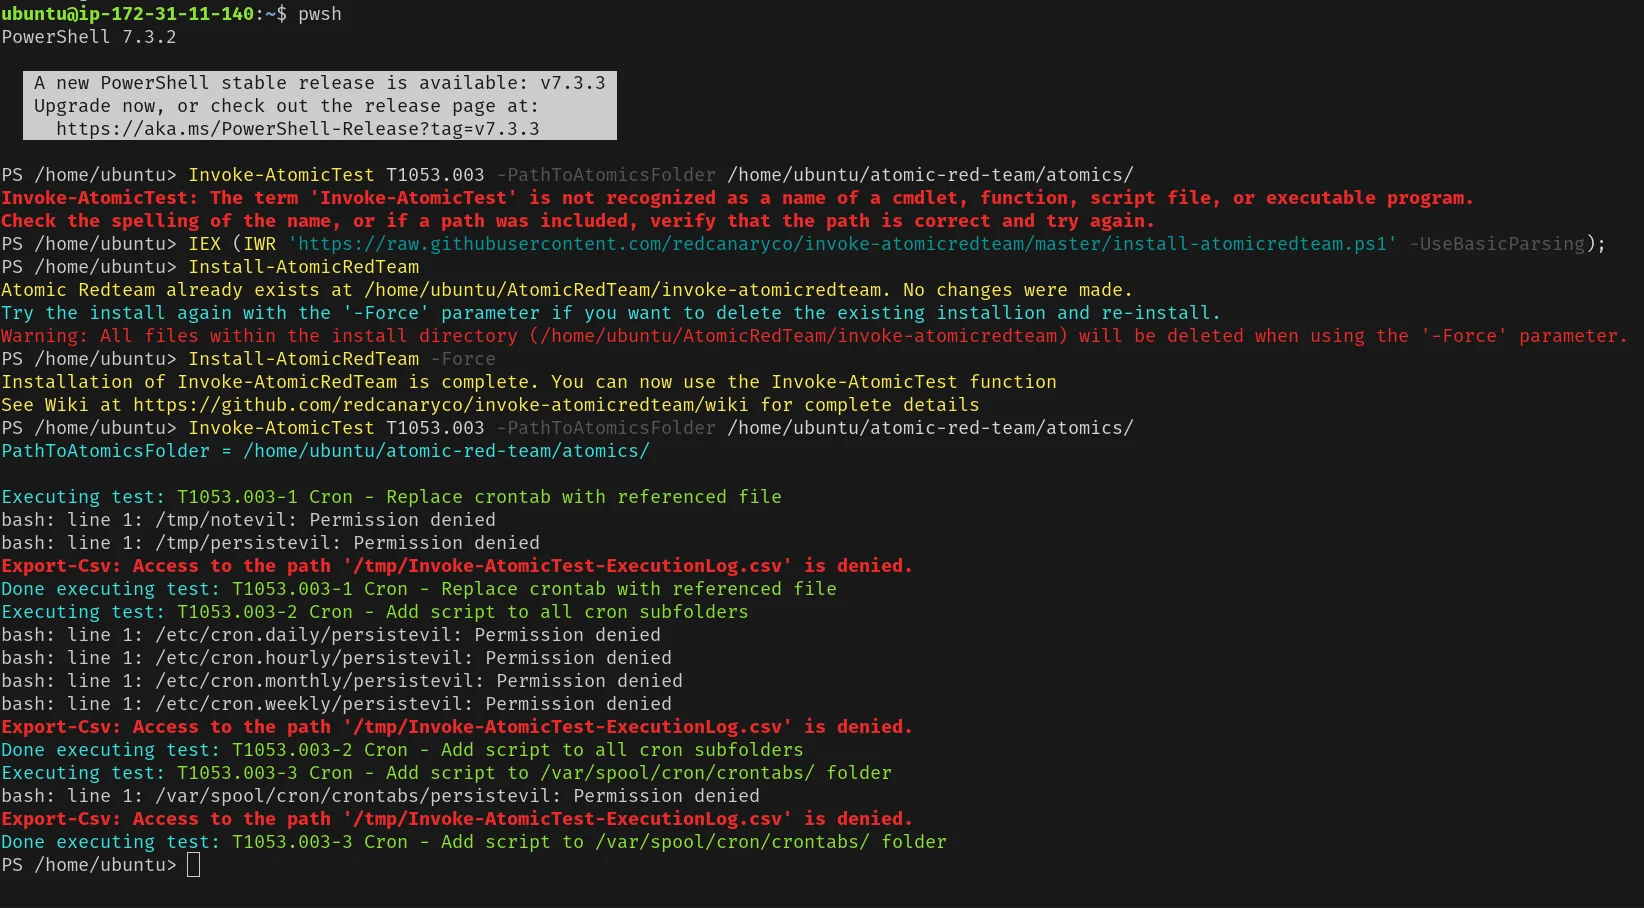
Install-AtomicRedTeam -Force4. You can now run Atomic Red Team tests using the Invoke-AtomicTest command. For example, to run the test for T1053.003, which is scheduled tasks: cron jobs, you can use the following command:
1
Invoke-AtomicTest T1053.003 -PathToAtomicsFolder /path/to/atomic-red-team/atomics/This command will run the test and display the output on the console. See the screenshot below:
Tip > To see more details about the test, you can add the -ShowDetails option:
1
Invoke-AtomicTest T1053.003 -ShowDetails -PathToAtomicsFolder /path/to/atomic-red-team/atomics/Tip > You can create your own tests by modifying existing Atomic Red Team tests or by creating new ones. To learn how to create tests, check out the Atomic Red Team documentation.
Example LQL policy
Here's an example LQL policy for detecting executions of the crontab and evil commands:
1
2
3
4
5
6
7
8
9
10
11
12
13
14
15
16
17
18
19
20
21
22
23
24
25
26
27
28
29
30
31
32
33
34
35
36
37
38
39
40
41
42
43
queryId: cron_executions

queryText: |-

  {

  source {

        LW_HA_SYSCALLS_EXEC

      }

      filter {

          (contains(CMDLINE, 'crontab') or contains(CMDLINE, 'evil'))

      }

      return {

          RECORD_CREATED_TIME,

          MID,

          PPID,

          PID,

          PARENT_EXE_PATH,

          EXE_PATH,

          CMDLINE,

          KERNEL_COMMAND,

          OS,

          CONTAINER_ID

      }

  }
Results
After running the T1053.003 test, run the following query with the Lacework CLI to verify:
1
lacework query run --start "-24h@h" --end "@h" -f cron_executions.yamlYou should see an output similar to the following:
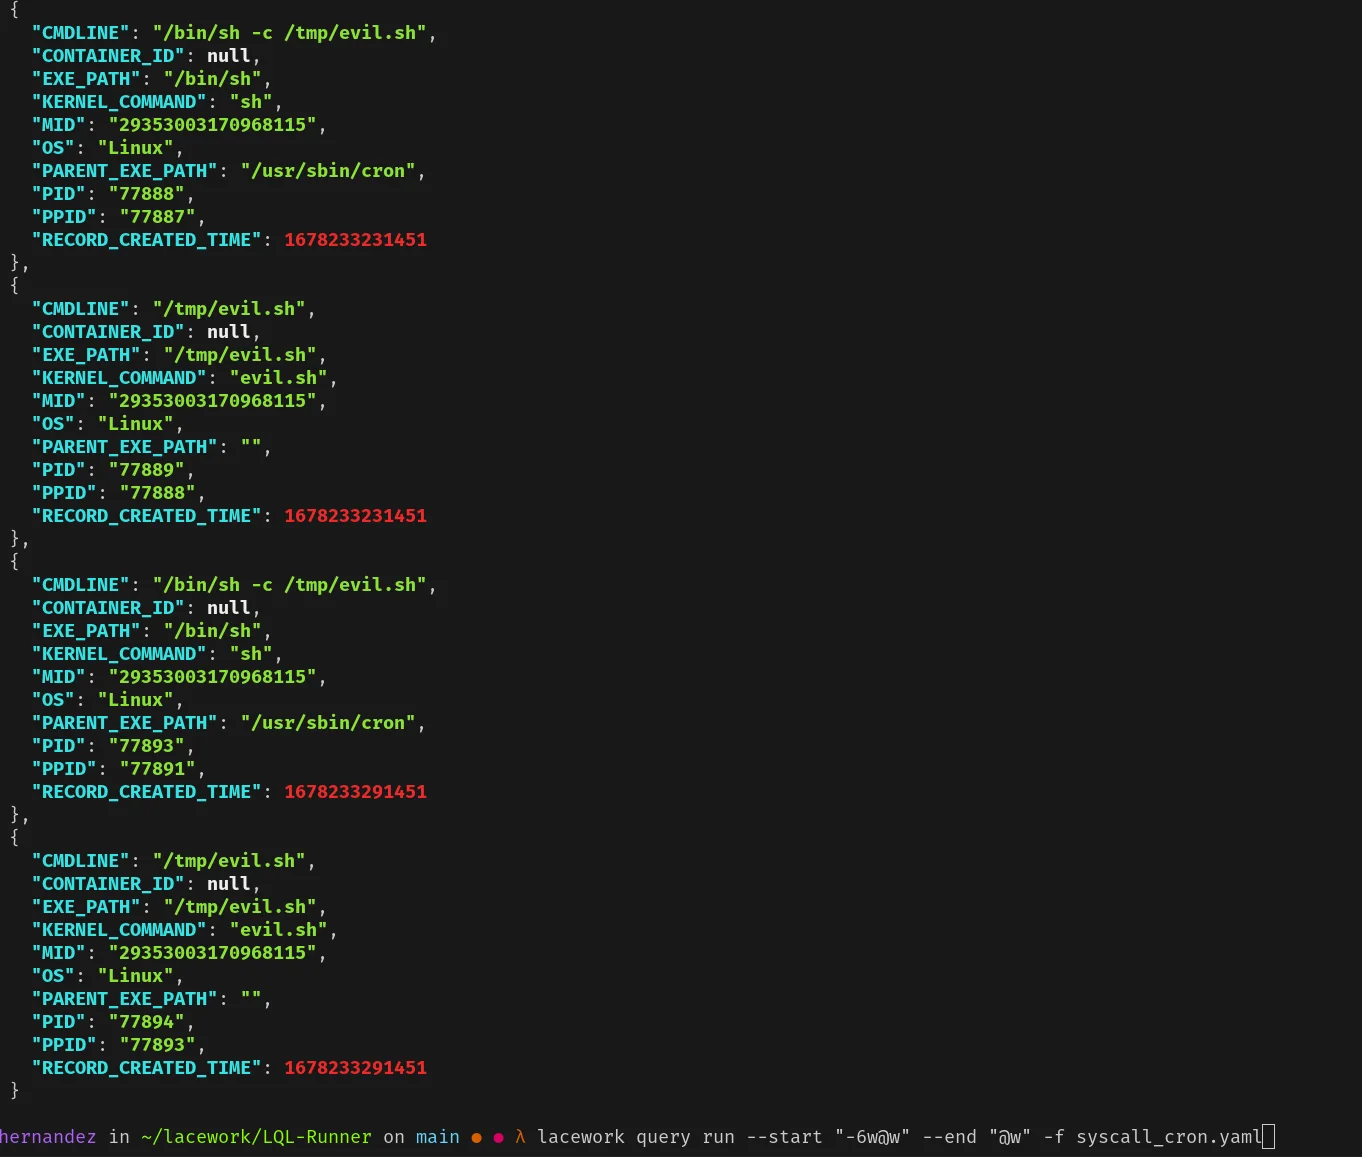
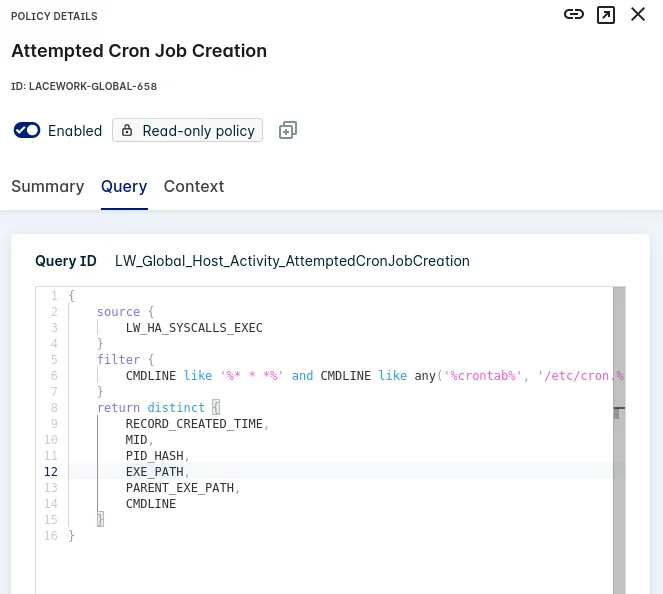
The output shows that the scheduled task was successfully created and executed, which indicates that the detection mechanism is working as expected. This LQL policy should not be used in production; however, Lacework does have an out-of-the-box detection called “Attempted Cron Job Creation.â€
T1609: Exec into a container – ExecIntoContainer
This TTP involves executing a command within a running container, which can be used by an attacker to gain unauthorized access to container resources or data. In this example, we will mimic a deployment with Minikube where our container will run from. Minikube in this case will be monitored by Lacework using our Daemonset configuration.
Prerequisites
Before you can run the tests, you need the following:
- A Lacework Linux agent reporting to a tenant and configured to collect syscalls. In this case, you will need, specifically the Kubernetes Daemonset configurations. See the screenshot below.
- Ensure you have the Atomic Red Team repository cloned on your machine, as mentioned in the previous example.
- Install PowerShell for Linux if you haven’t already, by following the instructions here.
- Install Docker on your machine, following the official Docker installation guide.
- Install Minikube on your machine by following the official Minikube installation guide.
- Install kubectl.
Steps
First, let's focus on getting Minikube running with the Lacework agent installed.
1. Start Minikube by running the following command:
1
/usr/local/bin/minikube start
2. Create a Lacework namespace in your Kubernetes cluster:
1
kubectl create namespace lacework3. Obtain the Lacework configuration file named:
1
lacework-cfg-k8s.yaml from the Kubernetes Config Download script pictured above. If you need a reference, here is an example. For more details, refer to the Lacework documentation.
4. Apply the Lacework configuration to your Kubernetes cluster:
1
kubectl create -f lacework-cfg-k8s.yaml -n lacework5. Deploy the Lacework Linux agent using the provided lacework-k8s.yaml file. Here is an example for reference.:
1
kubectl apply -f lacework-k8s.yaml -n laceworkNow that you have the Lacework Linux agent deployed on your Kubernetes cluster, you can proceed to run the Atomic Red Team test for T1609.
6. Open PowerShell by running the following command:
1
pwsh
7. Install Invoke-AtomicRedTeam. The execution engine we will use:
1
2
IEX (IWR 'https://raw.githubusercontent.com/redcanaryco/invoke-atomicredteam/master/install-atomicredteam.ps1' -UseBasicParsing)
Install-AtomicRedTeam -Force
8. Run the prerequisites command for T1609 for Atomic Test 1, adjust your
atomics folder path accordingly:
1
Invoke-AtomicTest T1609 -TestNumbers 1 -GetPrereqCommand -PathToAtomicsFolder /path/to/atomic-red-team/atomics/

9. Execute the test with a specific argument for Atomic that passes in the namespace as "lacework":
1
Invoke-AtomicTest T1609 -TestNumbers 1 -PathToAtomicsFolder /path/to/atomic-red-team/atomics/ -InputArgs @{"namespace" = "lacework"}This atomic by default runs the uname command on a busybox container in the specified namespace, in our case, “lacework†because this is where we deployed our agent to. See the screenshot below:

Tip > To see more details about the test, you can add the -ShowDetails option:
1
Invoke-AtomicTest T1609 -ShowDetails -PathToAtomicsFolder /path/to/atomic-red-team/atomics/Example LQL policy
Here’s an example LQL policy for detecting docker exec commands:
1
2
3
4
5
6
7
8
9
10
11
12
13
14
15
16
17
18
19
20
21
22
23
24
25
26
27
28
29
30
31
32
33
34
35
36
37
38
39
40
41
42
43
queryId: kubectl_exec_uname_commands

queryText: |-

  {

  source {

     LW_HA_SYSCALLS_EXEC

   }

   filter {

       contains(CMDLINE, 'kubectl') and contains(CMDLINE, 'exec') and contains(CMDLINE, 'uname')

   }

   return {

       RECORD_CREATED_TIME,

       MID,

       PPID,

       PID,

       PARENT_EXE_PATH,

       EXE_PATH,

       CMDLINE,

       KERNEL_COMMAND,

       OS,

       CONTAINER_ID

   }

  }
Results
After running the T1609 test, run the following query with the Lacework CLI to verify:
1
lacework query run --start "-1h@h" --end "@h" -f kubectl_exec_uname.yamlYou should see an output similar to the following:
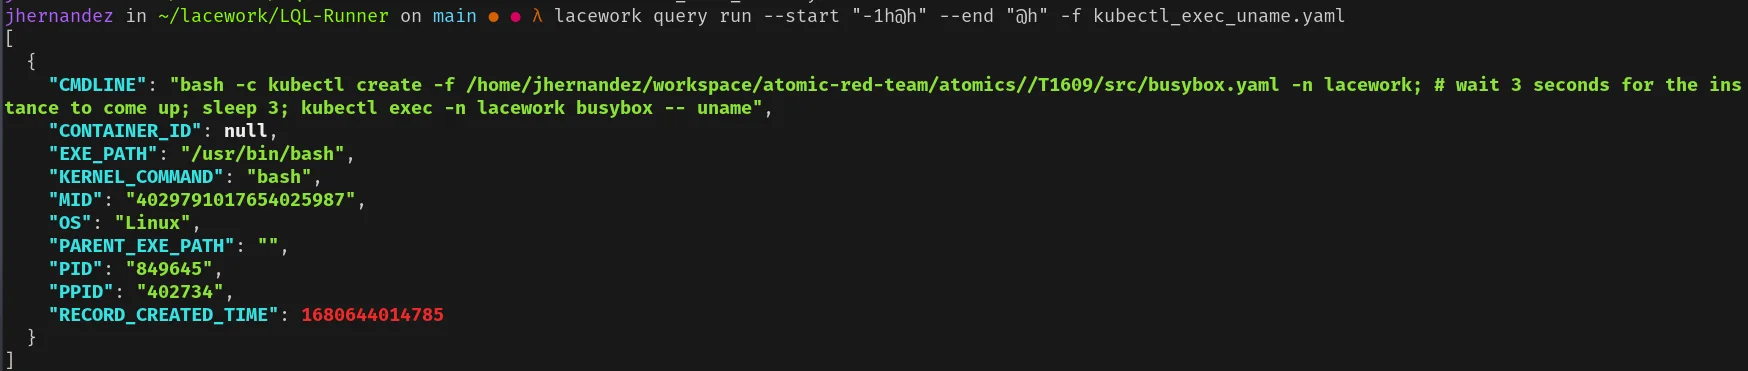
The output shows that the kubectl exec command was successfully executed within the container, indicating that the detection mechanism is functioning as expected.
T1136.003: Create new IAM user
This TTP involves creating a new identity and access management (IAM) user in AWS. Adversaries create new IAM users so that their malicious activity does not interrupt the normal functions of the compromised users and can remain undetected for a long time.
Prerequisites
Before you can run the tests, you need to have the following:
- AWS CLI installed and configured with a default profile
- The Atomic Red Team repository cloned on the machine
- PowerShell for Linux installed by following the instructions here
Steps
1. Install the AWS CLI by following the official AWS CLI installation guide.
2. Configure your AWS default profile by running the following
command:
1
aws configure
3. Open PowerShell by running the following command:
1
pwsh
4. Install Invoke-AtomicRedTeam, the execution engine we will use:
1
2
IEX (IWR 'https://raw.githubusercontent.com/redcanaryco/invoke-atomicredteam/master/install-atomicredteam.ps1' -UseBasicParsing)
Install-AtomicRedTeam -Force
5. Run the prerequisites command for T1136.003:
1
Invoke-AtomicTest T1136.003 -TestNumbers 1 -GetPrereqCommand
6. Execute the test for T1136.003:
1
Invoke-AtomicTest T1136.003 -TestNumbers 1 -PathToAtomicsFolder /path/to/atomic-red-team/atomics/This command will create a new IAM user in AWS with the default username "atomicredteam".

Example LQL policy
Here’s an example LQL policy for detecting the creation of new IAM users:
1
2
3
4
5
6
7
8
9
10
11
12
13
14
15
16
17
18
19
20
21
22
23
24
25
26
27
28
29
30
31
32
33
34
35
36
37
38
39
queryId: aws_create_iam_user

queryText: |-

  {

  source {

     CloudTrailRawEvents

      }

      filter {

   EVENT:eventName = 'CreateUser'

      }

      return {

       EVENT_TIME,

       INSERT_TIME,

       EVENT_NAME,

     EVENT:eventCategory as CATEGORY,

     EVENT:eventSource as ESOURCE,

     EVENT:eventType as ETYPE,

     EVENT:sourceIPAddress as SOURCE_IP_ADDRESS,

     EVENT:userAgent as UA

      }

  }
Results
After running the T1136.003 test, run the following query with the Lacework CLI to verify:
1
lacework query run --start "-24h@h" --end "@h" -f aws_create_iam_user.yamlYou should see an output similar to the following:
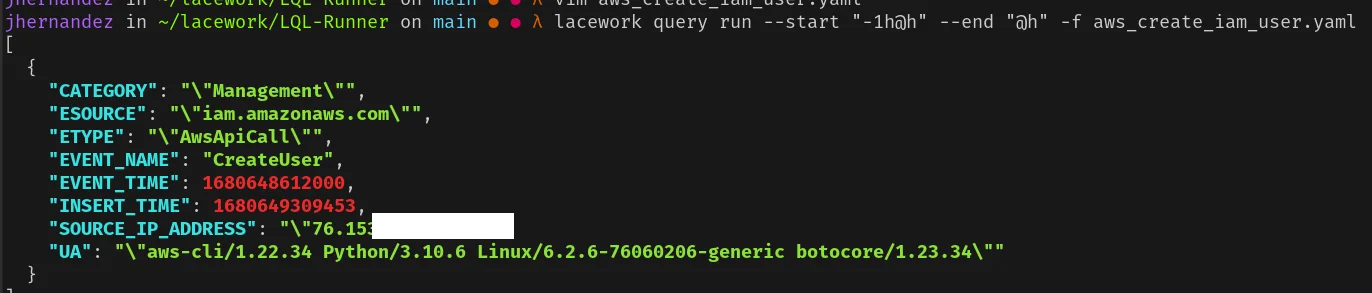
The output shows that the new IAM user was successfully created, indicating that the detection mechanism is functioning as expected. Remember to delete the created IAM user to clean up your AWS environment by running the cleanup command:
1
Invoke-AtomicTest T1136.003 -TestNumbers 1 -PathToAtomicsFolder /path/to/atomic-red-team/atomics/ -Cleanup

The power and flexibility of LQL policies
These three examples demonstrated the power and flexibility of Lacework’s LQL policies and Atomic Red Team’s attack simulations.
The LQL policies presented in this blog are examples and may not be the best detection policies for your production environment. They should serve as a starting point for developing more robust and tailored detection policies that fit your specific requirements.
By leveraging Atomic Red Team in conjunction with the Lacework platform, you can enhance your security efforts and ensure your organization is better prepared to detect and respond to threats in the cloud.
So, go ahead and start exploring the world of Atomic Red Team and Lacework to ensure that your enterprise’s cloud-based detections are up to the mark. With Lacework’s rich feature set and Atomic Red Team’s extensive library of attack simulations, you have the tools you need to bolster your organization’s security posture. Happy testing!
Suggested for you